Hello everybody, it is Jim, welcome to my recipe page. Today, I will show you a way to make a distinctive dish, sand dollar cookies. One of my favorites. This time, I’m gonna make it a little bit tasty. This is gonna smell and look delicious.
Sand Dollar Cookies is one of the most favored of recent trending meals in the world. It is easy, it’s quick, it tastes yummy. It is enjoyed by millions every day. They’re nice and they look wonderful. Sand Dollar Cookies is something that I’ve loved my whole life.
To make these sand dollar cookies, I was debating on using my Soft & Thick Snickerdoodle recipe. However, I wanted a flatter cookie so they would have more resemblance to sand dollars. Roll into balls and place in the bag.
To get started with this recipe, we must prepare a few ingredients. You can cook sand dollar cookies using 14 ingredients and 6 steps. Here is how you can achieve it.
The ingredients needed to make Sand Dollar Cookies:
- Get Cookie Dough :
- Prepare 1/2 cup (1 stick) unsalted butter, softened to room temperature
- Get 3/4 cup granulated sugar
- Get 1 large egg, at room temperature
- Prepare 1 tsp. vanilla extract
- Take 1 1/2 cup all purpose flour
- Take 1 tsp. cream of tartar
- Get 1 tsp. baking powder
- Take 1/2 tsp. baking soda
- Take 1/4 tsp. salt
- Take Cookie Topping :
- Take 1/4 cup granulated sugar
- Prepare 1 tsp. ground cinnamon
- Get 1/2 cup sliced almonds
The term sand dollar (also known as a sea cookie or snapper biscuit in New Zealand, or pansy shell in South Africa) refers to species of flat, burrowing sea urchins belonging to the order Clypeasteroida. Some species within the order, not quite as flat, are known as sea biscuits. Sand Dollar Cookies- very cute as a. As it heats, pour the sugar and cinnamon into a gallon-sized resealable.
Steps to make Sand Dollar Cookies:
- In a large bowl using either a hand mixer or a stand mixer with the paddle attachment, cream the softened butter on medium speed for a minute or so, until creamy. Then add the 3/4 cup sugar and beat until fluffy and light in color. Beat in the egg and vanilla extract. Scrape down the sides of the bowl as needed. Set this aside.
- In a separate bowl, whisk together the flour, salt, baking powder, baking soda and cream of tartar. With your mixer running on low speed, add the dry ingredients to the wet in 3 parts until it is all incorporated.
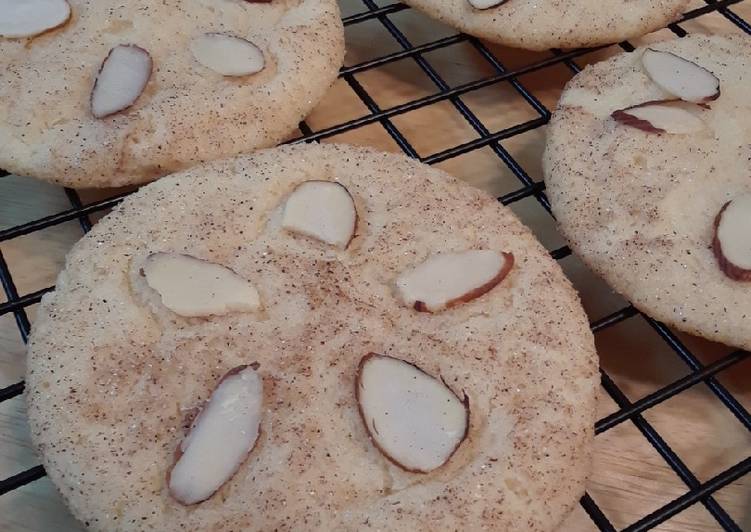
- Roll the dough into balls, about 1 tbsp. of dough per ball. In a small bowl, whisk together the 1/4 cup sugar and the cinnamon. Roll each dough ball into the cinnamon sugar mixture to coat. Then press in 5 almonds slivers per dough ball, as pictured, in a sand dollar design.
- Place the dough balls in the fridge to chill for at least 2 hours and up to 48 hours. Once you're ready to bake, preheat the oven to 350°F. Line a couple large baking trays with either parchment paper or silicone baking mats. When placing the dough balls on the prepared trays, make sure to leave plenty of room between them, about 3 inches. I baked 6 at a time on a half sheet size tray.
- Bake for 8-10 minutes. The cookies will appear still very soft and undone. Allow the cookies to cool on the baking trays for 3 minutes, then transfer them to a wire rack to cool completely.
- Store these cookies for up to 1 week in a covered container at room temperature.
Sand dollar cookies might just be the easiest cookies you'll ever make. I say that all the time. But these cookies require nothing more than a round cutter and a bit of white icing. Remove from oven, and allow cookies to cool on baking sheets. Common Name(s): Common sand dollar or northern sand dollar; also known as sea cookies, snapper biscuits, sand cakes, cake urchins, or pansy shells.
So that is going to wrap it up with this exceptional food sand dollar cookies recipe. Thanks so much for your time. I’m sure you can make this at home. There is gonna be more interesting food at home recipes coming up. Remember to save this page on your browser, and share it to your family, friends and colleague. Thank you for reading. Go on get cooking!